Buy Verified Cash App Account – Complete Guide for Gaming Business Owners |
Email: contact.smmproit@gmail.com
Telegram: @smmproit
Whatsapp:+1(818)278-2627
https://smmproit.com/product/buy-verified-cash-app-accounts/
Introduction to Verified Cash App Accounts
In today’s digital world, online payments move faster than ever. Whether you run a gaming business, manage live streaming broadcast music, or handle financial transactions daily, having a verified cash app account can make life much easier.
Many users search for ways to buy verified cash app account services because they want instant access, higher transaction limits, and secure money transfers. Think of it like upgrading from a bicycle to a sports car. You still reach the destination, but the ride becomes smoother, faster, and safer.
Cash app accounts are now widely used for gaming payments, creator tools creator tools, premium services, and even Bitcoin trading. A verified account opens doors to additional features that unverified accounts simply cannot access.
What Is a Verified Cash App Account?
A verified cash app account is an upgraded Cash App profile that has completed identity verification using a government-issued ID, phone number, and personal details.
Difference Between Verified and Unverified Accounts
Unverified accounts come with limited access. You may face restrictions on sending money, receiving payments, or using Bitcoin services.
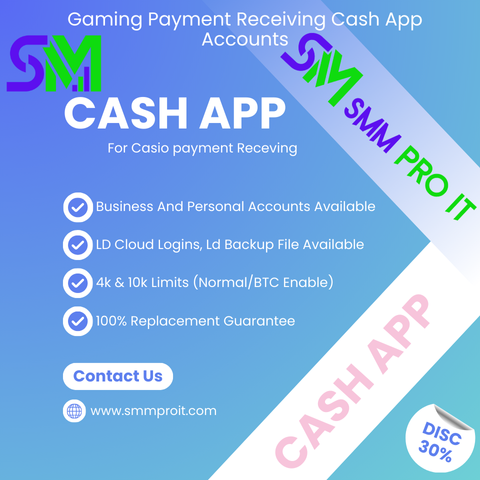
Verified cash app accounts provide:
Higher transaction limits
Better trust and security
Faster financial transactions
Access to premium services
Bitcoin trading support
Better account upload options
Why Verification Matters for Financial Transactions
When handling money online, trust matters. Verification acts like a digital passport. It proves the account belongs to a real person.
This is especially useful for:
Game host businesses
Creators upload systems
Live stream payments
Offline listening download subscriptions
Tips & subscriptions stats use listener insights services
Why Should You Buy Verified Cash App Accounts for Your Gaming Business?
Gaming businesses often process hundreds of transactions every day. Players purchase upgrades, game credits, and premium features constantly.
Using verified cash app accounts helps avoid payment delays and restrictions.
Fast Payments and Smooth Transactions
Nobody likes waiting for payments. A verified account improves transfer speed and reduces failed payments.
Imagine hosting a tournament and suddenly your payment app freezes due to transaction limits. That can hurt your reputation quickly.
Better Trust for Game Host Services
Players trust businesses that use verified payment systems. A verified account creates confidence and professionalism.
When users see your payment system works smoothly, they feel safe spending money.
Higher Transaction Limits for Gaming Businesses
Gaming businesses often need to process large amounts daily. Verified cash app accounts allow bigger transactions compared to unverified accounts.
That means more freedom and less stress.
The Positive Side of Buy Verified Cash App Accounts
There are several advantages when you buy a verified cash app account.
Improved Security and Access
Verification protects your account from suspicious activity. It also provides easier recovery if something goes wrong.
You gain better access to:
Premium services
Creator tools
Live streaming features
Banking support
Bitcoin trading
Additional Features and Premium Services
Many additional features become available after verification.
These include:
BTC enabled transfers
Higher money limits
Faster withdrawals
Secure bank account linking
Better transaction history access
How to Unlock Cash App Borrow?
Cash App Borrow is a feature that allows users to borrow money directly through the app.
Requirements for Cash App Borrow Feature
To unlock this feature, you usually need:
A verified cash app account
Active transactions
Good account history
Linked bank account
Valid phone number
Step-by-Step Process to Enable Borrow
Open Cash App
Click the Banking tab
Search for the Borrow option
Follow identity verification
Accept loan terms if eligible
Not every account gets this feature immediately. Active usage helps increase eligibility over time.
Benefits of Owning Buy Verified Cash App Accounts for Gaming Business
Gaming entrepreneurs benefit greatly from verified accounts.
Managing Multiple Profiles Easily
Many gaming businesses operate multiple profiles for different services.
A verified account allows smoother management of:
Profile posts
Creators upload systems
Game purchases
Listener payments
Handling Live Streaming Broadcast Music Payments
Content creators and streamers often receive donations during live streams.
Verified cash app accounts make receiving money simple and reliable.
Unlimited Uploads Share Infinite Transactions
Businesses handling frequent payments need uninterrupted service.
Verified accounts support:
Unlimited uploads share infinite transfers
Better payment tracking
Faster payment approvals
How to Buy Verified Cash App Accounts from smmproit
Many users choose smmproit because of fast delivery and customer support.
Step-by-Step Buying Guide
Visit the service provider
Select your preferred verified account
Complete payment
Receive account upload details
Login and change credentials immediately
What You Receive After Purchase
Most services include:
Verified account access
Phone number support
Free login information
Account upload details
BTC enabled options
Why Do People Trust smmproit
Trust is one of the biggest reasons users choose smmproit.
24 Hours Reply Contact Support
Reliable customer support matters. Users appreciate 24 hours reply contact assistance for urgent problems.
Secure Account Upload and Delivery
smmproit focuses on secure delivery systems that reduce account risks and improve customer confidence.
Their services are popular among gaming businesses and digital creators.
When Buy Verified Cash App Accounts?
Timing matters when purchasing a verified account.
Best Time to Upgrade Upgrade Upgrade Pro
If your business handles growing transaction volumes, now may be the right time to upgrade upgrade upgrade pro services.
Who Needs Verified Accounts Most?
Verified accounts work best for:
Gaming businesses
Streamers
Online creators
Crypto traders
Freelancers
Live stream users
Buy Verified Cash App Accounts – Popular Search Terms Explained
People search using different phrases online.
Buy a Verified Cash App Account
This keyword usually refers to users seeking fully verified accounts ready for immediate use.
Buy Cash App Verified Account
This variation focuses on purchasing accounts with verified identity access.
Buy Verified Cash App Account Reddit
Many Reddit discussions talk about account reliability, trust, and seller reviews.
Buying Verified Cash App Account
Users often compare prices, features, and security before buying.
Benefits of a Verified Cash App Account
Higher Transaction Limits
Verified accounts allow larger daily and weekly transfers.
Safer Banking and Money Transfers
Linking a bank account becomes easier and safer after verification.
This improves trust during financial transactions.
How to Buy a Verified Cash App Account
Checking the Seller’s Reputation
Always research before purchasing.
Look for:
Positive reviews
Customer feedback
Active support channels
Secure payment methods
Avoiding Scam Services
Avoid services with no customer support or suspicious pricing.
Cheap accounts often come with risks.
Buy BTC Enabled Cash App Account
Bitcoin access is one reason many users buy verified cash app accounts.
Bitcoin Features and Crypto Access
BTC enabled accounts support:
Bitcoin withdrawals
Crypto purchases
Faster blockchain transactions
This is useful for gaming businesses accepting cryptocurrency payments.
What Is the Limit of a Verified Cash App?
Verification increases transaction limits significantly.
Sending and Receiving Limits Explained
Verified accounts can send and receive much larger amounts compared to unverified accounts.
This makes them ideal for business owners handling larger payments.
How Does Cash App Work?
Cash App functions as a mobile payment platform.
Connecting Your Bank Account
Users connect their bank account for faster withdrawals and deposits.
Using Phone Number and Government-Issued ID
Verification requires:
Phone number
Government-issued ID
Personal information
This improves security and prevents fraud.
Why Do You Buy Verified Cash App Accounts?
People buy verified cash app accounts for convenience, speed, and expanded features.
Benefits include:
Better transaction support
Higher trust
Crypto access
Improved money management
Faster transfers
Is It Safe to Enable Bitcoin on the Cash Application?
Yes, Bitcoin services are generally safe when used responsibly.
Always protect your account using:
Strong passwords
Two-factor authentication
Trusted devices
Security is like locking your front door. Small precautions prevent big problems.
How to Bypass Cash App Verification
Some people search for bypass methods, but legal verification is always safer.
Why Legal Verification Is Better
Verified accounts reduce risks like:
Suspensions
Transaction blocks
Fraud warnings
Legal verification provides long-term stability.
Can I Have 2 Verified Cash App Accounts?
Yes, users may operate multiple profiles if they follow platform rules.
Many businesses manage separate accounts for:
Gaming revenue
Business expenses
Creator tools creator tools
Live streaming services
How to Verify Cash App on Android
Follow these simple steps:
Open Cash App
Enter profile settings
Submit your phone number
Upload government-issued ID
Wait for approval
The process usually takes little time.
Free Verified Cash App Account – Is It Worth It?
Free verified cash app account offers may sound tempting, but many are unsafe.
Always use trusted providers to avoid scams or stolen accounts.
Remember: if something sounds too good to be true, it usually is.
How to Create a Verified Cash App Account
Creating an account is simple.
Steps include:
Download Cash App
Register using your phone number
Connect your bank account
Verify your identity
Start sending money
After verification, you gain access to additional features and premium services.
Where’s The Best Place To Buy A Verified Cash App Account?
Many buyers look for reliable providers online. According to Reviews Fund business discussions, trusted sellers matter more than low prices.
Reviews Fund Business Recommendation
Reviews Fund business sources often mention providers with good support, secure account upload systems, and active communication.
Why smmproit Is a Trusted Service Provider
smmproit is considered a reliable service provider because they focus on:
Secure verified account delivery
24 hours reply contact support
Trusted customer service
Fast account access
BTC enabled options
Strong trust and reputation
Their services help gaming businesses manage transactions more smoothly while reducing payment problems.
Conclusion
Buying a verified cash app account can help gaming businesses, streamers, creators, and online entrepreneurs operate more efficiently. Verified cash app accounts offer better security, higher transaction limits, Bitcoin access, and smoother financial transactions.
Whether you manage live streams, creators upload systems, or gaming payments, having a verified account creates trust and stability. Services like smmproit continue gaining attention because they provide convenient access and support for users looking to scale their businesses.
In the fast-moving online world, using verified tools is no longer optional. It’s becoming essential.
FAQs
1. What is a verified cash app account?
A verified cash app account is an account confirmed with identity documents like a government-issued ID and phone number.
2. Why do gaming businesses use verified cash app accounts?
Gaming businesses use them for faster transactions, higher payment limits, and improved customer trust.
3. Can I buy a BTC enabled Cash App account?
Yes, some providers offer BTC enabled accounts with Bitcoin transaction support.
4. Is it safe to buy verified cash app accounts?
It can be safe when using trusted providers with good customer reviews and secure delivery systems.
5. Can I use multiple verified cash app accounts?
Yes, multiple profiles may be allowed depending on platform policies and account usage.
Buy Verified Cash App Account – Complete Guide for Gaming Business Owners |
Email: contact.smmproit@gmail.com
Telegram: @smmproit
Whatsapp:+1(818)278-2627
https://smmproit.com/product/buy-verified-cash-app-accounts/
Introduction to Verified Cash App Accounts
In today’s digital world, online payments move faster than ever. Whether you run a gaming business, manage live streaming broadcast music, or handle financial transactions daily, having a verified cash app account can make life much easier.
Many users search for ways to buy verified cash app account services because they want instant access, higher transaction limits, and secure money transfers. Think of it like upgrading from a bicycle to a sports car. You still reach the destination, but the ride becomes smoother, faster, and safer.
Cash app accounts are now widely used for gaming payments, creator tools creator tools, premium services, and even Bitcoin trading. A verified account opens doors to additional features that unverified accounts simply cannot access.
What Is a Verified Cash App Account?
A verified cash app account is an upgraded Cash App profile that has completed identity verification using a government-issued ID, phone number, and personal details.
Difference Between Verified and Unverified Accounts
Unverified accounts come with limited access. You may face restrictions on sending money, receiving payments, or using Bitcoin services.
Verified cash app accounts provide:
Higher transaction limits
Better trust and security
Faster financial transactions
Access to premium services
Bitcoin trading support
Better account upload options
Why Verification Matters for Financial Transactions
When handling money online, trust matters. Verification acts like a digital passport. It proves the account belongs to a real person.
This is especially useful for:
Game host businesses
Creators upload systems
Live stream payments
Offline listening download subscriptions
Tips & subscriptions stats use listener insights services
Why Should You Buy Verified Cash App Accounts for Your Gaming Business?
Gaming businesses often process hundreds of transactions every day. Players purchase upgrades, game credits, and premium features constantly.
Using verified cash app accounts helps avoid payment delays and restrictions.
Fast Payments and Smooth Transactions
Nobody likes waiting for payments. A verified account improves transfer speed and reduces failed payments.
Imagine hosting a tournament and suddenly your payment app freezes due to transaction limits. That can hurt your reputation quickly.
Better Trust for Game Host Services
Players trust businesses that use verified payment systems. A verified account creates confidence and professionalism.
When users see your payment system works smoothly, they feel safe spending money.
Higher Transaction Limits for Gaming Businesses
Gaming businesses often need to process large amounts daily. Verified cash app accounts allow bigger transactions compared to unverified accounts.
That means more freedom and less stress.
The Positive Side of Buy Verified Cash App Accounts
There are several advantages when you buy a verified cash app account.
Improved Security and Access
Verification protects your account from suspicious activity. It also provides easier recovery if something goes wrong.
You gain better access to:
Premium services
Creator tools
Live streaming features
Banking support
Bitcoin trading
Additional Features and Premium Services
Many additional features become available after verification.
These include:
BTC enabled transfers
Higher money limits
Faster withdrawals
Secure bank account linking
Better transaction history access
How to Unlock Cash App Borrow?
Cash App Borrow is a feature that allows users to borrow money directly through the app.
Requirements for Cash App Borrow Feature
To unlock this feature, you usually need:
A verified cash app account
Active transactions
Good account history
Linked bank account
Valid phone number
Step-by-Step Process to Enable Borrow
Open Cash App
Click the Banking tab
Search for the Borrow option
Follow identity verification
Accept loan terms if eligible
Not every account gets this feature immediately. Active usage helps increase eligibility over time.
Benefits of Owning Buy Verified Cash App Accounts for Gaming Business
Gaming entrepreneurs benefit greatly from verified accounts.
Managing Multiple Profiles Easily
Many gaming businesses operate multiple profiles for different services.
A verified account allows smoother management of:
Profile posts
Creators upload systems
Game purchases
Listener payments
Handling Live Streaming Broadcast Music Payments
Content creators and streamers often receive donations during live streams.
Verified cash app accounts make receiving money simple and reliable.
Unlimited Uploads Share Infinite Transactions
Businesses handling frequent payments need uninterrupted service.
Verified accounts support:
Unlimited uploads share infinite transfers
Better payment tracking
Faster payment approvals
How to Buy Verified Cash App Accounts from smmproit
Many users choose smmproit because of fast delivery and customer support.
Step-by-Step Buying Guide
Visit the service provider
Select your preferred verified account
Complete payment
Receive account upload details
Login and change credentials immediately
What You Receive After Purchase
Most services include:
Verified account access
Phone number support
Free login information
Account upload details
BTC enabled options
Why Do People Trust smmproit
Trust is one of the biggest reasons users choose smmproit.
24 Hours Reply Contact Support
Reliable customer support matters. Users appreciate 24 hours reply contact assistance for urgent problems.
Secure Account Upload and Delivery
smmproit focuses on secure delivery systems that reduce account risks and improve customer confidence.
Their services are popular among gaming businesses and digital creators.
When Buy Verified Cash App Accounts?
Timing matters when purchasing a verified account.
Best Time to Upgrade Upgrade Upgrade Pro
If your business handles growing transaction volumes, now may be the right time to upgrade upgrade upgrade pro services.
Who Needs Verified Accounts Most?
Verified accounts work best for:
Gaming businesses
Streamers
Online creators
Crypto traders
Freelancers
Live stream users
Buy Verified Cash App Accounts – Popular Search Terms Explained
People search using different phrases online.
Buy a Verified Cash App Account
This keyword usually refers to users seeking fully verified accounts ready for immediate use.
Buy Cash App Verified Account
This variation focuses on purchasing accounts with verified identity access.
Buy Verified Cash App Account Reddit
Many Reddit discussions talk about account reliability, trust, and seller reviews.
Buying Verified Cash App Account
Users often compare prices, features, and security before buying.
Benefits of a Verified Cash App Account
Higher Transaction Limits
Verified accounts allow larger daily and weekly transfers.
Safer Banking and Money Transfers
Linking a bank account becomes easier and safer after verification.
This improves trust during financial transactions.
How to Buy a Verified Cash App Account
Checking the Seller’s Reputation
Always research before purchasing.
Look for:
Positive reviews
Customer feedback
Active support channels
Secure payment methods
Avoiding Scam Services
Avoid services with no customer support or suspicious pricing.
Cheap accounts often come with risks.
Buy BTC Enabled Cash App Account
Bitcoin access is one reason many users buy verified cash app accounts.
Bitcoin Features and Crypto Access
BTC enabled accounts support:
Bitcoin withdrawals
Crypto purchases
Faster blockchain transactions
This is useful for gaming businesses accepting cryptocurrency payments.
What Is the Limit of a Verified Cash App?
Verification increases transaction limits significantly.
Sending and Receiving Limits Explained
Verified accounts can send and receive much larger amounts compared to unverified accounts.
This makes them ideal for business owners handling larger payments.
How Does Cash App Work?
Cash App functions as a mobile payment platform.
Connecting Your Bank Account
Users connect their bank account for faster withdrawals and deposits.
Using Phone Number and Government-Issued ID
Verification requires:
Phone number
Government-issued ID
Personal information
This improves security and prevents fraud.
Why Do You Buy Verified Cash App Accounts?
People buy verified cash app accounts for convenience, speed, and expanded features.
Benefits include:
Better transaction support
Higher trust
Crypto access
Improved money management
Faster transfers
Is It Safe to Enable Bitcoin on the Cash Application?
Yes, Bitcoin services are generally safe when used responsibly.
Always protect your account using:
Strong passwords
Two-factor authentication
Trusted devices
Security is like locking your front door. Small precautions prevent big problems.
How to Bypass Cash App Verification
Some people search for bypass methods, but legal verification is always safer.
Why Legal Verification Is Better
Verified accounts reduce risks like:
Suspensions
Transaction blocks
Fraud warnings
Legal verification provides long-term stability.
Can I Have 2 Verified Cash App Accounts?
Yes, users may operate multiple profiles if they follow platform rules.
Many businesses manage separate accounts for:
Gaming revenue
Business expenses
Creator tools creator tools
Live streaming services
How to Verify Cash App on Android
Follow these simple steps:
Open Cash App
Enter profile settings
Submit your phone number
Upload government-issued ID
Wait for approval
The process usually takes little time.
Free Verified Cash App Account – Is It Worth It?
Free verified cash app account offers may sound tempting, but many are unsafe.
Always use trusted providers to avoid scams or stolen accounts.
Remember: if something sounds too good to be true, it usually is.
How to Create a Verified Cash App Account
Creating an account is simple.
Steps include:
Download Cash App
Register using your phone number
Connect your bank account
Verify your identity
Start sending money
After verification, you gain access to additional features and premium services.
Where’s The Best Place To Buy A Verified Cash App Account?
Many buyers look for reliable providers online. According to Reviews Fund business discussions, trusted sellers matter more than low prices.
Reviews Fund Business Recommendation
Reviews Fund business sources often mention providers with good support, secure account upload systems, and active communication.
Why smmproit Is a Trusted Service Provider
smmproit is considered a reliable service provider because they focus on:
Secure verified account delivery
24 hours reply contact support
Trusted customer service
Fast account access
BTC enabled options
Strong trust and reputation
Their services help gaming businesses manage transactions more smoothly while reducing payment problems.
Conclusion
Buying a verified cash app account can help gaming businesses, streamers, creators, and online entrepreneurs operate more efficiently. Verified cash app accounts offer better security, higher transaction limits, Bitcoin access, and smoother financial transactions.
Whether you manage live streams, creators upload systems, or gaming payments, having a verified account creates trust and stability. Services like smmproit continue gaining attention because they provide convenient access and support for users looking to scale their businesses.
In the fast-moving online world, using verified tools is no longer optional. It’s becoming essential.
FAQs
1. What is a verified cash app account?
A verified cash app account is an account confirmed with identity documents like a government-issued ID and phone number.
2. Why do gaming businesses use verified cash app accounts?
Gaming businesses use them for faster transactions, higher payment limits, and improved customer trust.
3. Can I buy a BTC enabled Cash App account?
Yes, some providers offer BTC enabled accounts with Bitcoin transaction support.
4. Is it safe to buy verified cash app accounts?
It can be safe when using trusted providers with good customer reviews and secure delivery systems.
5. Can I use multiple verified cash app accounts?
Yes, multiple profiles may be allowed depending on platform policies and account usage.